How to Self-Host Dify with Docker — Complete AI Workflow Guide 2026
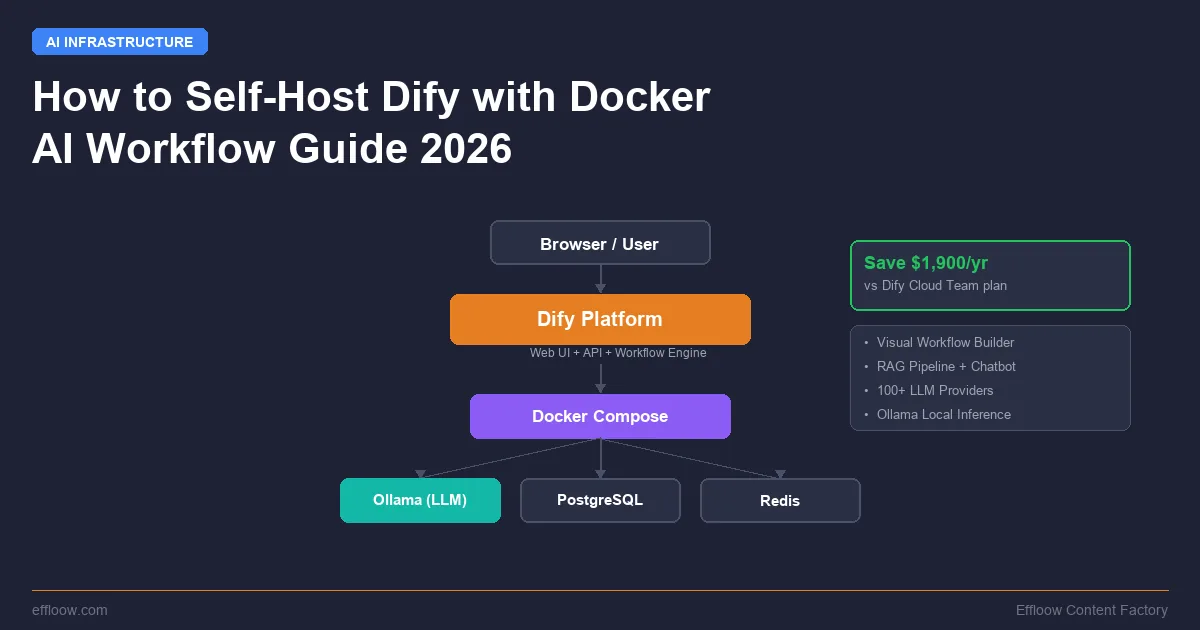
Dify Cloud's Team plan costs $159 per month. That is $1,908 per year for a platform you could run on a $5 VPS.
Dify is an open-source AI workflow platform with 136,000+ GitHub stars. It combines a visual workflow builder, RAG pipeline, agent capabilities, and model management into a single self-hostable package. Think of it as n8n or Make.com, but purpose-built for AI — and you own the entire stack.
This guide walks you through self-hosting Dify with Docker Compose, from first git clone to a working RAG chatbot and multi-step AI workflow. We will also connect Ollama for fully offline, private AI inference. No API keys required for the local LLM path.
By the end, you will have a production-capable Dify instance running on your own hardware, a working chatbot that answers questions from your documents, and enough context to decide whether Dify fits your project.
What Is Dify?
Dify is an open-source platform for building AI applications using a visual interface. Instead of writing Python scripts to chain LLM calls together, you drag and drop nodes on a canvas to build workflows — then deploy them as APIs or chatbots with a single click.
| Feature | Detail |
|---|---|
| GitHub stars | 136,000+ (as of April 2026) |
| Current version | 1.10.1 |
| License | Dify Open Source License (based on Apache 2.0) |
| LLM support | OpenAI, Anthropic, Google, Ollama, 100+ providers |
| Core features | Workflow builder, RAG pipeline, Agent mode, Prompt IDE |
| Deployment | Docker Compose (self-hosted) or Dify Cloud |
What makes Dify different from writing code
If you have used frameworks like LangGraph or CrewAI, you know the pattern: install the SDK, write Python classes for each agent, manage state, handle errors, deploy somewhere. It works, but the iteration cycle is slow. Change a prompt? Redeploy. Add a step? Refactor code.
Dify's visual canvas lets you build the same pipelines without writing code for the orchestration layer. You still write code where it matters — custom tools, data transformations, API integrations — but the workflow logic is visual and instantly editable.
This is not "no-code for people who cannot code." It is a productivity tool for developers who want faster iteration on AI workflows.
What Dify includes out of the box
- Workflow Builder: Visual canvas for multi-step AI pipelines. Supports branching, loops, conditionals, and parallel execution.
- RAG Pipeline: Built-in document ingestion with chunking, embedding, and vector search. Upload PDFs, Markdown, or plain text and query them immediately.
- Agent Mode: Define agents with tools (web search, code execution, API calls) that reason and act autonomously.
- Prompt IDE: Compare model responses side by side. Test different prompts against the same input.
- Model Management: Connect any LLM provider — or run local models through Ollama.
- API Backend: Every app you build gets an API endpoint automatically. No separate deployment needed.
Why Self-Host Dify? The Cost Breakdown
The financial argument for self-hosting is straightforward. Here is what Dify Cloud costs versus running your own instance:
Dify Cloud pricing (as of April 2026)
| Plan | Monthly price | Message credits | Team members | Knowledge storage |
|---|---|---|---|---|
| Sandbox | Free | 200 | 1 | 50 MB |
| Professional | $59/month | 5,000/month | 3 | 5 GB |
| Team | $159/month | 10,000/month | 50 | 20 GB |
Source: dify.ai/pricing — prices verified April 2026.
Self-hosted cost
| Component | Monthly cost | Notes |
|---|---|---|
| VPS (Hetzner CX22 or similar) | ~$5/month | 2 vCPU, 4 GB RAM, 40 GB SSD |
| Domain + SSL | $0 | Let's Encrypt is free |
| LLM inference (Ollama, local) | $0 | Runs on the same VPS for small models |
| LLM inference (API, optional) | Pay-per-use | Only if you want GPT-4, Claude, etc. |
| Total | ~$5/month | $60/year |
Annual savings vs Dify Cloud Team: $1,908 - $60 = $1,848.
The catch: you handle your own updates, backups, and troubleshooting. If that sounds like work you would rather avoid, Dify Cloud is a legitimate option — especially for the Sandbox tier, which is free and good enough for experimentation.
For everyone else who prefers owning their infrastructure — as we discussed in our guide to self-hosting your dev stack for under $20/month — let us set this up.
Prerequisites
Before starting, make sure you have:
- A server or local machine with at least 2 CPU cores and 4 GB RAM
- Local: macOS 10.14+, Linux, or Windows with WSL 2
- VPS: Any provider works. We use Hetzner for the price-to-performance ratio.
- Docker installed (Docker Desktop on Mac/Windows, or Docker Engine on Linux)
- Docker Compose v2 (ships with Docker Desktop; install separately on Linux if needed)
- Git for cloning the repository
- A domain name (optional, but recommended for production with SSL)
Verify your setup
docker --version
# Expected: Docker version 27.x or newer

docker compose version
# Expected: Docker Compose version v2.x

git --version
# Expected: git version 2.x
If any of these commands fail, install the missing tool before continuing. Docker's official installation guides cover every platform.
Step-by-Step: Docker Compose Setup
This is the core of the guide. We will go from zero to a running Dify instance in about 10 minutes.
Step 1: Clone the Dify repository
Clone the latest stable release:
git clone --branch "$(curl -s https://api.github.com/repos/langgenius/dify/releases/latest | jq -r .tag_name)" https://github.com/langgenius/dify.git
This command automatically fetches the tag for the latest release instead of cloning the unstable main branch. At the time of writing, that is v1.10.1.
If you do not have jq installed, you can clone a specific version directly:
git clone --branch v1.10.1 https://github.com/langgenius/dify.git
Step 2: Navigate to the Docker directory
cd dify/docker
This directory contains the docker-compose.yaml and the environment template.
Step 3: Configure environment variables
cp .env.example .env
The default .env works out of the box for local development. For production, you should change these values:
# Open .env in your editor
nano .env
Critical settings to review:
# Security: Generate a unique secret key
SECRET_KEY=sk-your-unique-random-string-here

# Database password (change from default)
DB_PASSWORD=your-secure-database-password

# Redis password
REDIS_PASSWORD=your-secure-redis-password

# If using a custom domain with separate subdomains for frontend/backend:
# COOKIE_DOMAIN=yourdomain.com
# NEXT_PUBLIC_COOKIE_DOMAIN=1
Generate a secure secret key with:
openssl rand -base64 42
Step 4: Start Dify
docker compose up -d
This pulls all required images and starts the services. The first run downloads several gigabytes of Docker images — give it a few minutes on a typical connection.
Step 5: Verify all services are running
docker compose ps
You should see these services in a "running" state:
- api — Dify backend API
- worker — Background task processor
- worker_beat — Scheduled task manager
- web — Frontend application
- plugin_daemon — Plugin execution environment
- nginx — Reverse proxy (ports 80/443)
- db — PostgreSQL database
- redis — Redis cache
- weaviate — Vector database for RAG
- sandbox — Code execution sandbox
- ssrf_proxy — Security proxy for outbound requests
If any service shows as "restarting" or "exited," check its logs:
docker compose logs <service-name> --tail 50
Step 6: Complete initial setup
Open your browser and navigate to:
- Local:
http://localhost/install - VPS:
http://your-server-ip/install
Create your admin account. This is the first user and will have full access to all workspace settings.
After setup, access the main interface at http://localhost (or your server IP). You should see the Dify dashboard — a clean interface with options to create chatbots, workflows, and agents.
Connecting Ollama for Local LLMs
This is where self-hosting gets interesting. Instead of paying per API call to OpenAI or Anthropic, you can run open-source models locally through Ollama — completely free and fully private.
If you have not set up Ollama yet, our Ollama + Open WebUI self-hosting guide covers installation in detail. Here is the quick version for Dify integration.
Install Ollama
# macOS or Linux
curl -fsSL https://ollama.com/install.sh | sh

# Pull a capable model
ollama pull llama3.1:8b
For a VPS with limited RAM, start with smaller models:
# Lightweight option for 4GB RAM VPS
ollama pull qwen2.5:3b
Configure Dify to use Ollama
- Log into your Dify instance.
- Navigate to Settings → Model Provider.
- Find Ollama in the provider list and click Add.
- Configure the connection:
| Setting | Value |
|---|---|
| Model Name | llama3.1:8b (or whichever model you pulled) |
| Base URL | http://host.docker.internal:11434 (Mac/Windows) or http://172.17.0.1:11434 (Linux) |
| Model Type | LLM |
Important for Linux users: Docker containers cannot reach localhost on the host machine. Use the Docker bridge IP (172.17.0.1) or set OLLAMA_HOST=0.0.0.0 in your Ollama configuration and use your server's IP.
- Click Save and test the connection.
Verify the connection
After adding Ollama, go to Settings → Model Provider and you should see your Ollama models listed. Try sending a test message in a new chatbot app — the response should come from your local model with zero API cost.
Choosing the right model
| Model | RAM needed | Best for |
|---|---|---|
| Qwen 2.5 3B | 3 GB | Basic chat, small VPS |
| Llama 3.1 8B | 6 GB | General use, good quality |
| Gemma 4 12B | 10 GB | Strong reasoning, coding |
| Llama 3.1 70B | 48 GB | Near-frontier quality |
If you want to explore more local model options, our Gemma 4 local setup guide and the Docker Model Runner vs Ollama comparison cover model selection in depth.
Building Your First RAG Chatbot in Dify
RAG (Retrieval-Augmented Generation) is the killer feature for most Dify users. You upload your documents, and the chatbot answers questions using your data instead of hallucinating.
If you want to understand RAG fundamentals in depth, our RAG tutorial with LlamaIndex explains the concepts thoroughly. Here we will build one using Dify's visual interface — no code required.
Step 1: Create a Knowledge Base
- Go to Knowledge in the left sidebar.
- Click Create Knowledge.
- Name it something descriptive (e.g., "Product Documentation").
- Upload your documents — Dify supports PDF, Markdown, TXT, HTML, DOCX, and CSV.
Step 2: Configure chunking and indexing
Dify offers two indexing modes:
- High Quality: Uses an embedding model to create vector representations. Better retrieval accuracy, but requires an embedding model (OpenAI's
text-embedding-3-smallor a local alternative). - Economical: Uses keyword-based indexing. No embedding model needed, but lower retrieval quality.
For most use cases, choose High Quality. If you are running Ollama, you can use a local embedding model:
ollama pull nomic-embed-text
Then configure it in Dify's model settings as an embedding provider.
Step 3: Create a chatbot app
- Go to Studio → Create App → Chatbot.
- Name your app.
- In the app configuration:
- Set the Model to your preferred LLM (Ollama local or an API provider).
- Under Context, click Add and select your Knowledge Base.
- Write a system prompt:
You are a helpful assistant that answers questions based on the provided context.
If the context does not contain the answer, say so honestly.
Do not make up information.
Step 4: Test your chatbot
Use the Debug and Preview panel on the right to ask questions about your uploaded documents. Dify shows which document chunks were retrieved, so you can verify the answers are grounded in your data.
Step 5: Publish and share
Click Publish to make your chatbot available. Dify gives you multiple deployment options:
- Web app URL — A hosted chat interface anyone can access
- API endpoint — Integrate into your own application
- Embed code — Drop a chat widget into any website
Each app gets its own API key. You can rate-limit access and monitor usage from the dashboard.
Building an AI Workflow (Multi-Step Agent Pipeline)
Beyond simple chatbots, Dify's workflow builder lets you create multi-step AI pipelines — similar to what you would build with CrewAI or LangGraph, but visually.
Example: Content Research and Writing Pipeline
Let us build a workflow that takes a topic, researches it, writes an article, and reviews the output.
Step 1: Create a new workflow
Go to Studio → Create App → Workflow. You will see a canvas with a Start node.
Step 2: Add the research step
- Click + after the Start node.
- Add an LLM node.
- Configure it:
- Name: "Researcher"
- Model: Your preferred LLM
- Prompt:
You are a research analyst. Given the topic "{{topic}}", provide:
1. Key facts and statistics
2. Current trends
3. Common misconceptions
4. Three unique angles for an article

Be concise and factual. Cite sources where possible.
Step 3: Add the writing step
- Add another LLM node after the Researcher.
- Configure it:
- Name: "Writer"
- Model: Your preferred LLM (can be different from the researcher)
- Prompt:
You are a technical writer. Using the research below, write a 500-word article section.

Research:
{{researcher_output}}

Write in a practical, builder-oriented tone. Include specific examples and actionable advice.
Step 4: Add the review step
- Add a final LLM node.
- Configure it:
- Name: "Reviewer"
- Prompt:
Review this article section for:
1. Factual accuracy
2. Clarity and readability
3. Actionable value for the reader

Article:
{{writer_output}}

Provide specific suggestions for improvement, then output the final revised version.
Step 5: Run and iterate
Click Run to execute the entire pipeline. Dify shows the output of each node, so you can see exactly what the Researcher found, what the Writer produced, and what the Reviewer changed.
This is the same three-agent pattern we built in code with CrewAI — but built in 5 minutes instead of 50 lines of Python. The trade-off is flexibility: complex logic, custom tools, and programmatic control are easier in code. Simple-to-moderate workflows are faster in Dify's visual builder.
More workflow features
- Conditional branching: Route data through different paths based on LLM output or variable values.
- Code nodes: Write Python or JavaScript for custom transformations.
- HTTP request nodes: Call external APIs mid-workflow.
- Knowledge retrieval nodes: Pull RAG context at any point in the pipeline.
- Variable aggregator: Combine outputs from parallel branches.
Dify vs Flowise vs Langflow — Comparison
If you are evaluating self-hosted AI workflow platforms, these three are the main contenders. Here is how they compare (star counts are approximate snapshots that change continuously — check each repository for the live figure):
| Feature | Dify | Flowise | Langflow |
|---|---|---|---|
| GitHub stars | 136K+ | 36K+ | 52K+ |
| Primary language | Python + TypeScript | TypeScript | Python |
| Visual builder | Yes, full canvas | Yes, node-based | Yes, node-based |
| Built-in RAG | Yes, complete pipeline | Yes, via components | Yes, via components |
| Agent support | Yes, native | Yes, via LangChain | Yes, native |
| Built-in chat UI | Yes, publishable apps | Yes, embedded chat | Yes, playground |
| Plugin system | Yes (plugin daemon) | Limited | Community components |
| Multi-user / teams | Yes, workspace-based | Basic auth | Basic auth |
| API generation | Automatic for all apps | Yes | Yes |
| Model providers | 100+ via native integration | Via LangChain | Via LangChain/direct |
| Prompt IDE | Yes, with comparison | No | Basic |
| Self-host complexity | Docker Compose (11 services) | Docker Compose (1-2 services) | Docker Compose (1-2 services) |
| Resource requirements | 4 GB+ RAM | 1-2 GB RAM | 2 GB RAM |
| Best for | Production AI apps with teams | Quick LangChain prototypes | Flexible AI pipelines |
| License | Apache 2.0 (modified) | Apache 2.0 | MIT |
When to choose Dify
- You need multi-user workspace management with roles and permissions.
- You want built-in RAG without configuring vector databases separately.
- You are building customer-facing AI applications that need publishable UIs and APIs.
- You want a Prompt IDE for systematic prompt engineering.
When to choose Flowise
- You want the lightest possible self-hosted option (runs on 1 GB RAM).
- You are already deep in the LangChain ecosystem.
- You need a quick prototype, not a production platform.
When to choose Langflow
- You want the most flexible node-based builder.
- You prefer Python-based customization.
- You want community-contributed components.
For automation workflows that are not AI-specific (connecting SaaS tools, triggering actions, processing data), consider n8n, Zapier, or Make instead — they are better suited for general automation.
Production Tips
Running Dify locally for testing is one thing. Running it reliably for a team or customer-facing application requires a few additional steps.
Reverse proxy with SSL
For production, put Dify behind a reverse proxy with HTTPS. Here is a minimal Caddy configuration (Caddy handles SSL automatically via Let's Encrypt):
dify.yourdomain.com {
    reverse_proxy localhost:80
}
Or with Nginx:
server {
    listen 443 ssl http2;
    server_name dify.yourdomain.com;

    ssl_certificate /etc/letsencrypt/live/dify.yourdomain.com/fullchain.pem;
    ssl_certificate_key /etc/letsencrypt/live/dify.yourdomain.com/privkey.pem;

    location / {
        proxy_pass http://localhost:80;
        proxy_set_header Host $host;
        proxy_set_header X-Real-IP $remote_addr;
        proxy_set_header X-Forwarded-For $proxy_add_x_forwarded_for;
        proxy_set_header X-Forwarded-Proto $scheme;
    }
}
If you are using a self-hosted PaaS like Coolify or Dokploy — which we compared in our Coolify vs Dokploy guide — they handle reverse proxy and SSL automatically.
Backups
The critical data to back up:
- PostgreSQL database — Contains all your apps, workflows, and user data.
- Vector database (Weaviate) — Contains your RAG knowledge base embeddings.
- Uploaded files — Documents you uploaded for knowledge bases.
A simple backup script:
#!/bin/bash
# Backup Dify data
BACKUP_DIR="/backups/dify/$(date +%Y%m%d)"
mkdir -p "$BACKUP_DIR"

# Backup PostgreSQL
docker compose exec -T db pg_dump -U postgres dify > "$BACKUP_DIR/dify_db.sql"

# Backup volumes
docker compose cp weaviate:/var/lib/weaviate "$BACKUP_DIR/weaviate_data"

echo "Backup completed: $BACKUP_DIR"
Run this daily via cron. Test your restore process before you need it.
Updating Dify
Check the Dify GitHub Releases for new versions. The update process:
cd dify/docker

# Pull latest changes
git fetch --all
git checkout v1.10.1  # Replace with the new version tag

# Check for .env changes
diff .env .env.example

# Apply any new environment variables, then restart
docker compose down
docker compose pull
docker compose up -d
Always review the release notes for breaking changes before updating. Back up your database before every major version upgrade.
Performance tuning
For a 4 GB RAM VPS, these settings help:
- Limit Weaviate memory in
.env:WEAVIATE_QUERY_DEFAULTS_LIMIT=10 - Use economical indexing mode if you do not need vector search
- Run smaller Ollama models (3B-8B parameter range)
- Monitor memory usage:
docker stats
For heavier workloads, upgrade to an 8 GB RAM VPS (~$10/month on most providers) — this gives comfortable headroom for Dify plus a local 8B model via Ollama.
Frequently Asked Questions
What is Dify used for?
Dify is an open-source platform for building AI applications — chatbots, RAG systems, multi-step workflows, and autonomous agents — using a visual interface. It handles LLM orchestration, document retrieval, and API deployment so you can focus on the application logic rather than infrastructure plumbing.
Is Dify free to self-host?
Yes. The self-hosted Community Edition is free under the Dify Open Source License (based on Apache 2.0). You pay only for your server costs and any external API calls to LLM providers. Using Ollama for local inference makes the LLM cost zero.
How much RAM does Dify need?
Minimum 4 GB for the Dify platform itself (without local LLM inference). If running Ollama alongside Dify for local models, plan for 8 GB+ depending on model size. A 3B parameter model needs ~3 GB additional RAM; an 8B model needs ~6 GB.
Can I use Dify with ChatGPT / Claude / Gemini?
Yes. Dify supports 100+ model providers. You can add your OpenAI, Anthropic, or Google API key in Settings → Model Provider and use any available model. You can also mix providers — use a cheap local model for simple tasks and GPT-4 or Claude for complex reasoning.
Dify vs LangChain — what is the difference?
LangChain is a Python/JavaScript library for building LLM applications in code. Dify is a visual platform that includes a workflow builder, RAG pipeline, and deployment tools. If you prefer writing code and need maximum flexibility, use LangChain (or LangGraph for agents). If you want faster iteration with a visual interface and built-in deployment, use Dify.
Can I run Dify and Ollama on the same server?
Yes, and this is the recommended setup for cost-effective self-hosting. Install Ollama on the host machine, pull your models, then configure Dify to connect via the Docker bridge IP. Both services share the same server, and Ollama handles inference while Dify handles orchestration.
How do I migrate from Dify Cloud to self-hosted?
Dify Cloud supports exporting your apps and workflows as DSL files. Download them from the cloud interface, then import them into your self-hosted instance via Studio → Import DSL. Knowledge bases need to be re-uploaded and re-indexed, as vector embeddings are not portable between instances.
Is Dify secure enough for production?
The self-hosted version includes sandboxed code execution, an SSRF proxy for outbound requests, and role-based access control. For additional security: run behind a reverse proxy with SSL, change all default passwords in .env, restrict network access to the Dify ports, and keep the platform updated.
What to Build Next
You have a running Dify instance. Here are practical next steps:
- Build a customer support bot — Upload your product docs as a Knowledge Base, create a chatbot app, embed it on your website.
- Create an internal research tool — Connect to your company's documents and let your team ask questions in natural language.
- Automate content workflows — Build the research-write-review pipeline from earlier and connect it to your publishing workflow.
- Experiment with agents — Give an LLM access to web search, code execution, and your internal APIs. Let it solve problems autonomously.
For more complex agent architectures, our tutorials on CrewAI and LangGraph show what is possible when you need programmatic control beyond what a visual builder offers.
The best part of self-hosting: every experiment costs you nothing beyond the electricity. No API meters ticking. No message credit limits. Just you, your models, and whatever you want to build.
What Effloow Added
Dify's docs explain its features; they don't tell you whether to run it or which of three similar tools to pick. We added the path and the judgment:
- A tested Docker Compose setup through a working RAG chatbot and a multi-step workflow, so the guide ends in something running rather than a feature tour.
- A three-way decision (Dify vs Flowise vs Langflow) keyed to concrete needs — multi-user workspaces, RAM budget, LangChain lock-in — plus a pointer to n8n/Zapier when the job isn't AI-specific at all.
- Production hardening notes for the gap between a demo instance and something you'd put in front of users.
The value is the runnable path plus the "is Dify even the right tool" call, not a restatement of the node list.
Last updated: April 2026. Dify version referenced: v1.10.1. All pricing verified at time of publication — check provider websites for current rates.
Get the next one
in your inbox.
One short weekly dispatch with new guides, tools, and what we tested. No spam, unsubscribe anytime.
Get weekly AI tool reviews & automation tips
Join our newsletter. No spam, unsubscribe anytime.
More in Articles
Self-host n8n with Docker Compose and build AI workflows. Source-verified guide covering setup, Ollama integration, agents, and deployment.
Source-verified comparison of Docker Model Runner and Ollama for local LLM deployment, covering setup, APIs, GPUs, Compose, and tool fit.
Self-host Ollama with Open WebUI in 2026. Source-backed setup paths, failure checks, use/skip guidance, and cost-planning links.
Step-by-step guide to self-hosting RAGFlow v0.25 with Docker Compose — deep document understanding, chunking strategies, MCP server, and the Python SDK.